With the General Data Protection Regulation (GDPR) about to be enforced, many website owners are also challenged: How do you make sure your website is compliant with these new rules? We have already discussed how you can make your website GDPR-proof with diverse WordPress plugins. Still, we kept missing one crucial plugin.
In order to meet the new, ‘privacy by default’ rule, WordPress plugins are only allowed to gather user data after your visitors have given you permission to do so. In other words, your website has to be accessible without personal data being gathered by default. The easiest solution for this — a cookie wall for your entire site — will no longer be allowed. So, how do you activate these WordPress plugins after your visitors have given their explicit consent?
GDPR Consent Plugin (€ 39/year)
For WordPress websites in Europe, WP Upgrader introduces the GDPR Consent Plugin: a plugin for WordPress that allows you to ask your customers’ permission before other WordPress plugins (and scripts) start gathering personal data. This way, you stop your site from gathering personal information before visitors actually allow you to do this.
How does the GDPR Consent Plugin work?
Step 1:
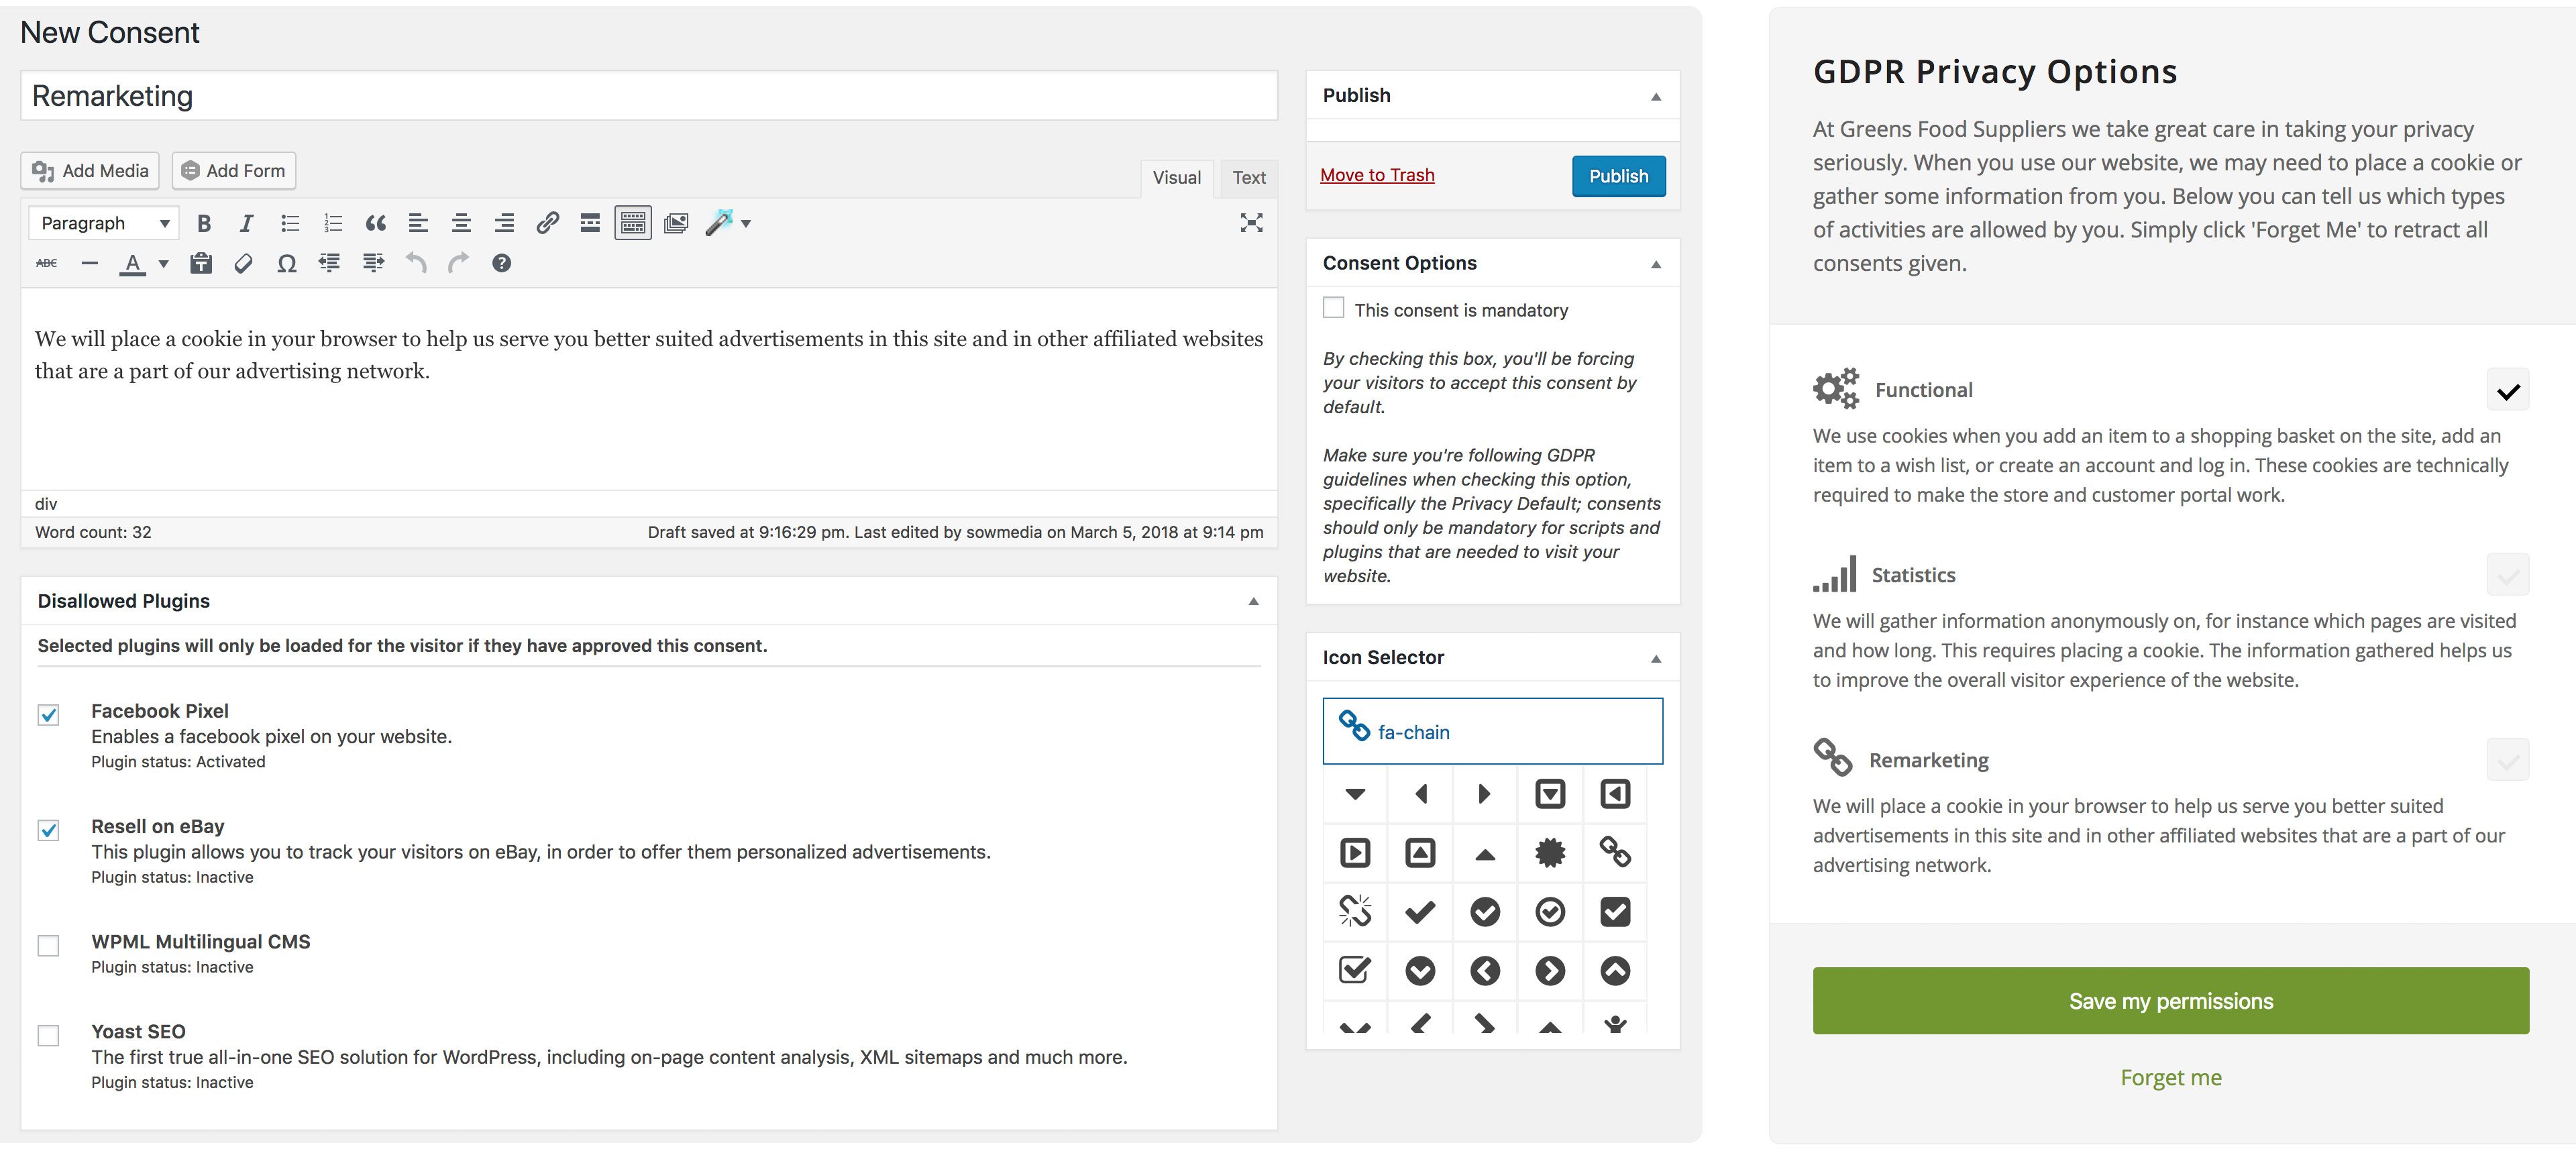
After having purchased the GDPR Consent Plugin, you have to determine which sections of your WordPress website gather personal data. Think in terms of plugins, but perhaps it may also apply to several scripts in your footer and/or header. You can sort this out by making use of the free GDPR-checklist for your WordPress website.
Personal data that is gathered, can be categorize in separate permission groups, such as ‘Statistics’, ‘Adverts’, and ‘Functional’. Inform yourself of the types of permission groups below this article.
Step 2:
Place the
Privacy settings
Edit your consent settings below.
We use Google Analytics to anonymously collect information about how our website is being used. Data is anonymised before it is stored and processed. To anonymise the data the last octet of your IP address is masked. Information collected is not shared with other Google services or third parties.
View detailsDuring your visit to this website we place a cookie to test whether cookies can be set by your browser. These cookies are required for a proper functioning of this website. They are not used to track personal information.
View detailsWe use advertisements on LinkedIn and Google Ads to bring our services to your attention. In doing so, we check whether our advertisements produce effective results.
View detailsStep 3:
From this point onward, visitors will be shown a slim bar at the bottom of their screen upon their first visit informing them of their rights. On the privacy settings page they can now indicate whether or not they want to allow additional data to be gathered. For instance, to receive customized advertisements. Only when they give permission, will these plugins be activated for this particular visitor.
[/av_textblock]
[av_notification title=’Tip’ color=’silver’ border=” custom_bg=’#444444′ custom_font=’#ffffff’ size=’large’ icon_select=’no’ icon=’ue800′ font=’entypo-fontello’ custom_class=” admin_preview_bg=” av_uid=’av-k9adn7′]
View the demo here: demo.wpupgrader.com
[/av_notification]
Does this make my WordPress website GDPR-proof?
The GDPR Consent Plugin is a tool to assist you in making your WordPress website GDPR-proof. This doesn’t mean that, by simply installing the plugin, your website will be automatically compliant.
Inform yourself on the impact of the GDPR on your WordPress website to get an impression of the additional aspects you have to take into account. Consider a solid privacy-statement on your website, ‘I agree’-tick boxes for contact forms, and a handling agreement with your hosting and administrative party. Also, take note that the GDPR will impact your entire organisation (for instance due to the right to have data erased from all records in your organization). Logically, such things are not solved by merely building a plugin into your website.
What kind of permission groups are there?
Common permission groups (‘Consents’) are groups such as ‘Functional’, ‘Statistics’, ‘Social media’, ‘Adverts’ and ‘Remarketing’. Certain organizations may set up specific labels for themselves. NPO.nl, for instance, makes a separate request for allowing ‘NPO Recommendations’.
You can define your own permission groups (‘Consents’) within the GDPR Consent Plugin. Some WordPress websites will use a Facebook pixel, remarketing plugins, etc., and then list them all under the ‘Adverts’ group. Others may prefer to split these into separate groups, like ‘Adverts’ and ‘Remarketing’.
Whatever your approach, it is important that you define your permission groups in such a way that visitors are not forced to activate plugins they do not necessarily need. Should a visitor agree to becoming part of statistics, for example, then this does not give you free range to automatically place cookies for social media sharing.
Celebrate consent!
Few visitors will explicitly give their consent to flooding them with ‘Adverts’ and ‘Remarketing’. This is why you will have to thoroughly explain what the added benefits are for doing just that. Terms like ‘Functional’, ‘Statistics’, ‘Social media’, ‘Adverts’, and ‘Remarketing’ are very technical in nature.
However, instead of having visitors mark the ‘Adverts’ and/or ‘Remarketing’ tick boxes, you can approach things from an entirely different perspective. Once you explain to them that you can optimally facilitate special offers, you may find the ones that do give permission, to be a smaller, but more committed target audience for your organization.