Changing your menu navigation in WordPress is very simple. In this manual, we will explain step by step how you can change a menu in your WordPress website.
Where do you edit a WordPress menu?
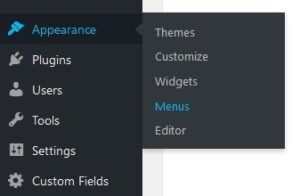
You edit your WordPress main menu as follows. Log into your WordPress website, go to ‘Appearance’ and click on ‘Menus’ in the left side menu. Click on ‘Select a menu to edit’ and choose the menu you want to change. Click on ‘Select’ and the menu will start loading.
Do you want to create a new menu, rather than changing one, then click on the button ‘Create a new menu’ and enter a menu name. Make sure you come up with a logical name, so you’ll be able to find it again later. This is especially important when you have more than one menu, for example, a main menu at the top of the website and another menu in the footer of your website. When you click on ‘Save menu’, the menu will be saved and will load automatically. In the next paragraph, you will learn how to fill your WordPress menu with menu items.
Adding buttons to your WordPress menu
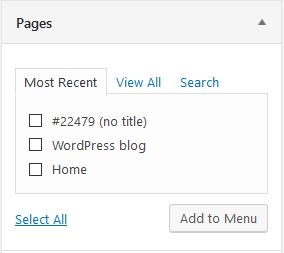
Select the pages, categories or messages you want to show in your menu by checking their box and clicking ‘Add to menu’.
The buttons will now appear on the right side of your screen. Click on ‘Save menu’ to save.
Editing buttons in your WordPress menu
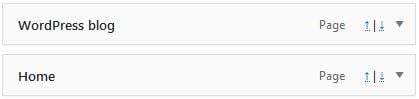
The buttons in your menu line up on the right side of your website. You can change the display order by clicking and dragging the items up or down. In the image below, you see an example of a menu containing two built-in buttons:
Next to every menu item, you can the item type (e.g. ‘Page’, ‘Category’, or ‘Message’). Next to this, you see arrows that allow you to change their display order. On the most right side, you see a small triangle. When you click here, a column with several options will unfold:
- Navigation label: Enter the text you want on your menu button.
- Title attribute: This is the text that appears in a tooltip, when you move your mouse over the menu item. This is not a mandatory field, but it is usually filled out to increase search engine friendliness.
- Link target: Where do you want this link to open (You can choose between ‘Same window or tab’ (recommended) or ‘New window or tab’).
- Remove: Click here to remove the menu item.
Important: When you’re done, don’t forget to click on ‘Save menu’ on the right top side.
Adding a link to another website in your WordPress menu
Sometimes you want to create a link to another website in your menu. For instance, a login button linking to a login page outside of the website. You create a link like this as follows. Click on ‘Custom links’:
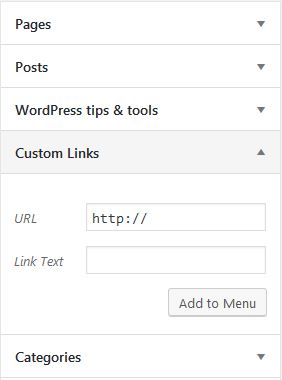
At ‘URL’ you add the web address and at ‘Link text’ you enter the name you want on the menu button. Then you click on ‘Add to menu’. Now you can drag the item to the desired place on the right. Often you want a link to an external website to open in a new window. So, remember to also click on the small triangle next to your link and choose ‘New window or tab’ under ‘Link target’.
Adding a submenu in WordPress
When you want to add a submenu as a menu item, this works the same way as adding a normal menu item. But when you drag the item to its desired place, you drag it a little more towards the right, under the desired item. For example, this is the way we organized a menu for a WordPress agency:
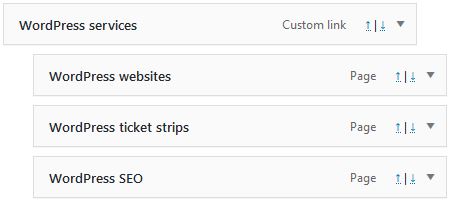
‘WordPress websites’ is now a submenu item of the main menu item ‘WordPress services’.
Generating WordPress menus automatically
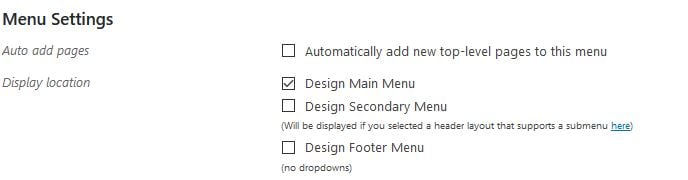
At the bottom, you also find the button ‘Menu settings’ which allows you to ‘Automatically add new top-level pages to this menu’. When you check this box, every page you create in WordPress is automatically added to this menu. We usually recommend you don’t use this option, because your menu can unexpectedly change if you use this feature.
Editing the location of your WordPress menu
Under Menu settings>Display location, you also find the option to determine where you want your menu to show on your WordPress website. These settings vary per WordPress theme. Some themes only have one menu location, others have several of them. The options below come from our favorite WordPress theme Enfold, but you possibly have different options here, if you’re using another theme:
By the way, you can also change this location at the top of your page. There you have two tabs: ‘Edit menus’ (the tab you’re working in right now) and the tab ‘Manage locations’. When you click here, you can specify for every menu where you want it to be.
Viewing the WordPress menu changes
Unlike messages and pages, WordPress menus doesn’t allow you to ‘Save concept’. However, it does allow you to click on ‘Manage with Live Preview’ at the top of the page. This will lead you to the WordPress Live preview mode, where you can see the direct result of the changes made to a menu while you change menu items or locations. This way, you can still view the changes before making it final by clicking ‘Save & publish’. When you do not want to save the changes, you can click on the cross in the top left corner.
Adding a WordPress menu to your footer
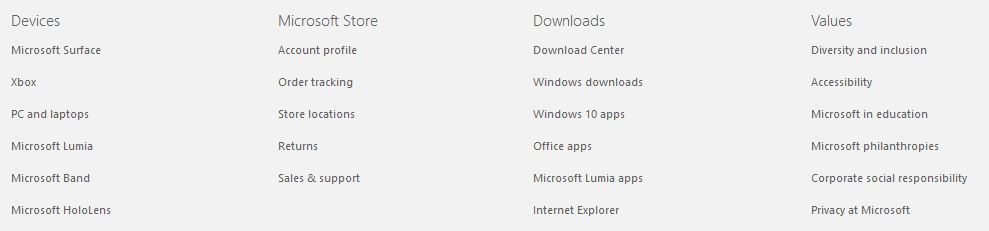
Generally, you want to keep the main menu at the top of your page short and simple, but you still want to offer links to many other pages. This is why you want a footer (at the bottom of your WordPress website). To place all the links of inferior importance. A nice example of this, is Microsoft ‘s website:
Main menu:

Footer menu:
This is easy to make in WordPress, as long as your WordPress theme supports widgets in the footer. That way you can place menu widgets in the footer. In WordPress, go to ‘Widgets’ via ‘Appearance’. Then you see, for example, three sidebars (these are the area’s where you can place your widgets):
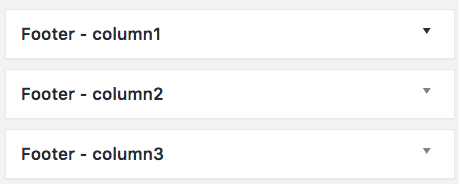
This means there are three columns available in the footer, where you can place widgets. In your case this might have a different name, but the description will often contain the word ‘footer’. Click on the triangle next to the widget area. The field will now enlarge and you can drag a widget towards it. All available widgets are on the left-hand side. Click on the widget ‘Adapted menu’ and drag this into the unfolded field. Then click on the triangle next to ‘Custom menu’ and select the menu you want to show:
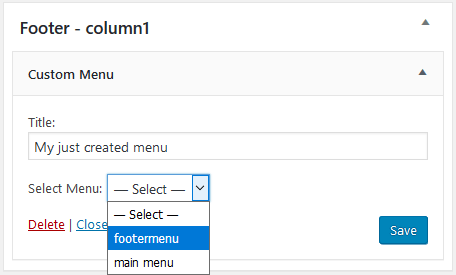
Finally, you click ‘Save’. The menu is now in the footer of your WordPress website. You can repeat this for every widget area.